August 2020 update! New “out of the box” text effects are rolling out to Canva accounts as we speak. I walk through what’s available here. (Spoiler, there still isn’t a Canva strikethrough text button, but oh well.)
Music: https://www.bensound.com/
For all that is amazing about Canva, the lack of provided, “out of the box” text effects is tough to overcome initially. And while effects may be rolling out shortly, there is no telling when they will be available to the masses.
That said, I debated putting this post together. But in the end, I’ve found that “hacking Canva” to create your own images or to be able to achieve the look you desire in your text or images is a lesson in creativity. Meaning, by not having an out of the box solution, you push yourself to innovate, and use what you do have at your disposal.
So, this post is going to be light on text if I can help it, and I’ll put a YoutTube video walkthrough up at some point, but for now, I wanted to go through some of my favorite “homemade” or user-generated text effects that might be able to help you out in a pinch.
Canva Text Effects
1. Bold, underline, italics
Actually, let’s start with the basics just so we can see all that’s currently available, and how that compares to what we can do with a little creativity.
So, when you think “basic,” you think bold, underline, and italics. These are all out of the box, “click of a button” effects; nothing at all crazy or new to report here.

2. Curve Text
Curving text in Canva used to be a manual chore, but now you can achieve a curved text look with the click of a few buttons. Simply go to “Effects” and select “Curve.” You can also adjust the amount of curve with the available slider.

3. Colors
When you were little, and you were feeling extra spicy with your designs, you’d go crazy with colors; it was just so easy. And, of course, you can also do that with Canva. Again, another couple clicks that don’t need any explanation.

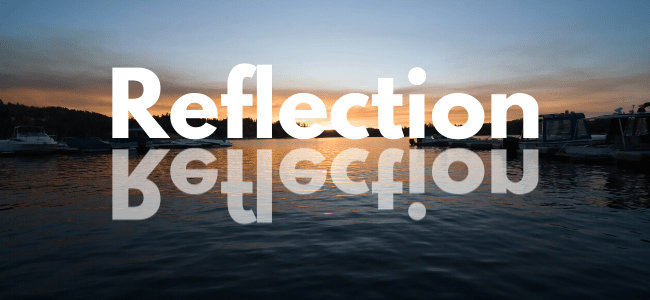
4. Reflection
OK, now we are talking.
In Canva, you can’t easily create a text reflection. And when I say “easy,” I mean with the click of a button like the many other easy Canva features.
But, as shown here, it’s totally doable, and may only require the click of a few buttons.

To add the reflection effect, first, create the text of your choosing.
Now, while you can easily copy the text and rotate to achieve somewhat of a reflection, something just looks off, right?

So, to achieve the true reflection, you actually need to download the text as an image, and then upload so you can then “flip” the text to get your reflection. (Here’s this, too, if you need help creating a transparent image background in Canva.)
Last step is to adjust the transparency so that the flipped text appears a bit lighter (I believe I went with about “50” on the transparency scale).
You can even have a bit of fun with water backgrounds. (And here is more info if you need to know how to remove the background in Canva.)
5. Shadow
A little bit easier here with the shadow. All it takes is creating your text, copying the text, and then changing the bottom layer to your desired color, and as shown in this case, a dark, shadowy blue.
Update: You can now shadow with the click of a button! Just go to “Effects” and you’ll see the different options.

6. Bubbles
Now this next one isn’t quite a text effect as much as it is a text spruce up, but serves as an example of how a little creativity can go a long way.
First thing I did was pick a bubbly font (Chewy). Then I simply grabbed a colored circle, and then placed a smaller, white circle inside of it to achieve the reflection.

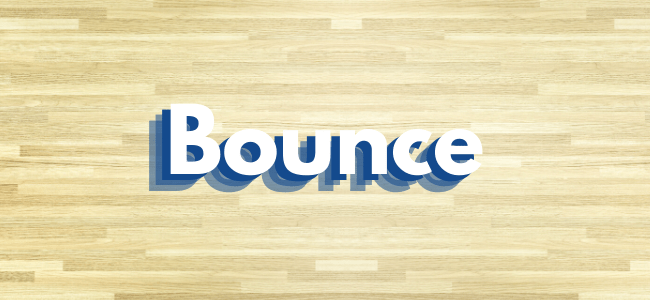
7. Bounce
To give your text some pep, and borderline 3D action, you can add multiple layers for a bounce effect.
This effect is as easy as it looks—simply create multiple layers of your text, and either change the color of each layer, or change the transparency, as I show here.
Update: You can now achieve a similar look with “Effects.” Choose “Echo” and then adjust the “Offset” and “Direction” to your liking.
8. Glow
To piggyback off the idea as mentioned above, you can take the same approach and make your words “glow.”
The only difference here is that instead of using multiple text layers, I’m using copies of a simple shape, and then again, changing the transparency levels.

(The shape used here was the 3D cylinder.)

0. Split
This one might not have as many use cases as the others, but again, the idea is to get you thinking about the different things you can do with the elements at your disposal.
Here, I created two layers of text and overlapped them.

I then grabbed a rectangle and changed the color to match the background. From there, I simply placed the rectangle over the intersecting text to create the split effect.
![]()
10. Outline (Kind of)
Update: You can now easily outline text with the click of a button. Go to “Effects” and then chose the “Splice” option. Then, move “Offset” slider to zero and adjust the thickness to your liking.
I included this one last because it’s the most difficult to pull off, and really, not even possible to completely pull off, but it will get you close.
It’s the dreaded question of how to outline text in Canva. The answer: you can’t, really. But, as shown below, you can at least get close, and depending on your needs, can do more of the shadow effect as mentioned above.

So, pretty straightfoward here. Simply create two text layers and change the color of one. Then, you’re simply resizing the text to achieve the desired outline effect.
With that, that’s it (for now). I’ll be adding more effects as I find myself needing something new, and of course, will report back here if out of the box text effects begin to roll out.
Any else you need? What are some text effects you wish existed?


