You’ve heard all about it and now you want to live it—Canva is so easy and makes design simple even for those with little to zero creative skills.
The problem is, with so much at your disposal, it can be a bit overwhelming when figuring how to go about using Canva.
For years, I’ve been adding posts and tutorials to this blog; many quite popular as landing spots when someone like you has a specific question and is seeking out a specific answer on how to use Canva.
What I found, though, is that if you don’t know how to use it in the first place, how do you even know what to search for in order to find that help?
So, I thought it was time to put together this ultimate guide to using Canva in order to dive into and summarize all that I’ve presented over the years in hopes of helping you kick things off with this amazing design tool, and to inspire creativity and ideas for your next design project.
Before we dive all the way in, a lot of this can be achieved with the free version of Canva, but some additional features are only available to Canva Pro members. If you want to give Pro a shot, you can do so for free for 30 days by clicking that link or the button below.
START CANVA PRO 30-DAY TRIALHow to Use Canva
This post will range from basic overviews to more in depth how-tos and tutorials, so feel free to skip around. I also encourage you to reach out with questions and current design challenges so I can keep this post updated with the latest tips and tricks.
- Starting a New Project
- Using the Toolbar
- Working with Images
- Text Effects
- Keyboard Shortcuts
- Uploading Fonts
- Creating Thin Lines
- Outlining Text
- Combining Shapes
- Removing Backgrounds
- Downloading Transparent Backgrounds
- Using Animation
- Creating an Animated GIF
- Using Frames
- Resizing Designs
- Changing Background Color
- Using Color Palette
- Creating Shadows
Starting a New Project
When creating a new project with Canva, you can use custom dimensions, or, if you know what type of project you want to create, you can choose from any of the many pre-made templates and dimensions.
As shown below, you can either 1) “create a design” or 2) search for a template by typing in the type of project you’d like to create like “Twitter background” or “birthday invitation,” etc. Or, 3) you can browse through the different visual cards to choose from the options presented.

Using the Toolbar
Once you’ve begun your design, you’ll notice a left-hand toolbar with a variety of different options, including the following.
Templates
Depending on the type of design you’re creating, you’ll see different available templated designs to choose from. These are pre-made designs you can work from in order to get the creative juices flowing.

Uploads
If you have images, photos, or audio you’d like to use in your project, you can upload them here. Pretty standard—just click “upload media” and then choose your file just like you’d do with most other programs. Once you upload, each item will be added to your upload library which you can access from that point forward for your current project or future designs.

Photos
Under “Photos” you’ll find Canva’s stock image library. You can either search by keyword or browse through the given categories. You’ll also see your “Recently Used” photos appear as you begin to use them, along with “Trending” options for the latest in relevant content.
Elements
This is where a lot of the magic starts to come together, as under elements you’ll see different lines, shapes, frames, stickers, charts, grids, gradients, and more.
Lines
As you begin using Canva more and more, you’ll notice a lot is very easy and useful, but some things are a bit harder than they should be at times. For instance, creating a thin line isn’t always the easiest endeavor.
Anyway, more on that in a bit, more here you can find a number of different “lines” from solid to dashed, dotted, and more.

Shapes
Just as you’d expect, if you need a square, circle, triangle, or other shapes, you can find them here. Can you draw in Canva? Well, technically, no. But one cool thing about the shapes is that because there are so many different options, if you’d like to create custom animations, you can easily do so by combining different shapes. Again, more on that to come.

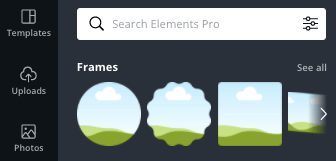
Frames
Frames in Canva allow you to confine images and videos to certain shapes. Meaning, if you have a square photo and want to crop it into a circle, this is where you go about it. More on how to use this section to come.
Stickers
Stickers are fun clip art-like elements that can be used to add life to otherwise static images. Think about these like the stickers and emojis you can add to social media images.

Charts
Bar charts, line graphs, pie charts, and more—if you need a quick and not-so-in-depth chart, you can find it here!

Grids
Think of a grid as a collage, where you can add a number of different photos to the same design—ranging from vertical and horizontal layouts, multiples of the same sizes, different sizes, and more.

Gradients
Depending on how it’s used, a gradient in Canva can help with the transition between different graphical elements, or can make it easier for you to place text on top of images or alongside images.

Text
In the text section, this is where you can add text and words to your projects. The options here allow you to add larger headings, a bit smaller subheadings, and normal paragraph text. You can also choose from different font combinations, as shown here:
(We will get into shortcuts later, but a quick shortcut to add a text box is simply clicking “t” on your keyboard.)

Styles
Styles allow you to choose from different palettes and color combinations to kick off your design.
Music & Videos
Won’t spend too much time here, but if you want to add music and video to your project, you can do so here.
Background
To add a background to your project, you can either choose a background here, or you can add a shape or photo. The difference here is that the background is immediately applied to cover the entire canvas.
Working with Images
When you add an image to your project, click and select that image, and you’ll see new options appear at the top of your screen, including “Effects,” “Filter,” and more.
Here is a breakdown of each.
Background Remover
This is a good time to mention that Canva offers a free version and a paid version. While there is so much available through the free version, you’ll notice the crown icon placed on the paid features.
So, with that, being able to remove a background from a photo is a paid feature (you can try Canva Pro free for 30 days), and you’d go about doing so here.
Just go to “Effects” and the first option you see is “Background Remover.” We will detail how to use this tool in a bit.
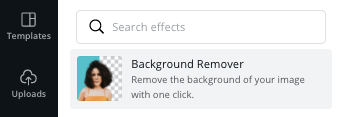
Image effects
- Duotone: Bring out photo highlights, while giving a splash of color
- Pixelate: Pixelates the photo for a retro look
- BadTV
- Glitch
- Liquify
- Screen
- Slice
- ColorMix
Here is a GIF running through a single option from each of the above (and each of the above offers more than one option!)

Filter
An option you should be used to seeing, right? That is, if you’re a user of a smartphone, social media platform, and basically any photo editing app available!
Here you can easily filter your photo with different colors, contrast, hues, highlights, and more with the click of a button. This is where you can also easily transform a color photo to grayscale.

Adjust
If you want to edit an image but don’t necessarily want to apply any major effects, the adjust section will allow you to edit traditional aspects like brightness, contrast, highlights, and more. This is where you can also blur an image, and where you can add a vignette when trying to make a photo look old.

Crop
Crop is pretty self-explanatory, as this is where you can crop or cut your image down to focus only on a particular area. So, if you have a horizontal photo of your dog, cropping will allow you to create a vertical photo, or a square, etc. More on how to crop below.
Flip
Another easy one! To flip an image in Canva, simply select it and then go to “Flip.” Once clicked, you’ll see options to flip horizontally or vertically.
Position
If you have multiple elements or images in a particular page or workspace, “Position” will allow you to move certain elements to the front, and others to the back. Think of it as being able to “layer” everything in front of you.
Copy Style (Paint Roller Icon)
If you’ve spent time perfecting a particular image with a particular filter or coloring, etc. the copy style option (which is represented by the pain roller icon) will allow you to copy that effect/look to another image.
Simply click the image with the style you want to copy, then click the paint roller icon, and then click the image you want the style copied to.
Transparency (Faded Checkerboard Icon)
Adjusting the transparency of your image will allow you to make it more “see through” for lack of a better alternative term.
To adjust the transparency of an image, you’ll click the faded checkerboard icon, and then slide the adjust to the left in order to decrease the transparency.
Link (Link Icon)
Linking in Canva follows the same process as linking in your favorite word processor and other familiar tools. Simply click the element you’d like to link, click the icon, and then add your URL destination.
Importantly, links only cary through upon download when you download the project as a PDF. Thus, adding a link and then downloading as a PNG, JPEG, etc. is all for not.
Lock (Padlock Icon)
The lock option allows you to lock an image in its current state, meaning it can’t be moved, edited, etc. This is helpful when working with a number of different elements in one workspace, and you don’t want to adjust a particular aspect on accident.
Duplicate (Page with + Icon)
Duplicate comes in handy when you want to create a brand new page with the exact setup and images as a previously created page, but perhaps just need to tweak one small element.
For instance, when creating flashing text for an Instagram image, you achieve this by duplicating a page and making minor adjustments so that when you download as a GIF or video, those adjustments “flash” as they scroll through.
Create Exit & Entrance Animations
You won’t see this option to animate until you deselect the image, but including it here. With animate, you can easily add entrance and exit animations to your graphics. From fade, tumble, neon (flicker), and more.
Now, animating is a bit of an acquired skill, and we will get into that a bit down the road.
Text Effects
Between manually working with text and using any of the out-of-the-box text effect features, there is so much you can do with Canva to elevate your text from simple to eye-catching.
Here is the list of options:
- Shadow:
- Lift
- Hollow
- Splice
- Echo
- Glitch
- Neon
- Curve
Simply select your text layer and then choose from the options. Here is an example of how each effect can look. Remember, though, each effect can also be adjusted for intensity and more.

Keyboard Shortcuts
There are many different Canva keyboard shortcuts, ranging from the basics you have available pretty much everywhere like those for copy and paste, to more advanced or lesser known options.
Here are a few of my favorites:
- “t” will add a text box
- “command” + down arrow will move layers back
- “/” will bring you to the elements search bar
- “command” + “shift” + “k” will convert text to caps
- “command” + “shift” + “l” will align text left
- “command” + “g” will group selected elements
Uploading Fonts
To add a font to Canva, you need to be a Canva Pro member (don’t worry, you can try Canva Pro free for 30-days if you have a project you’re working on).
From there, in your project, select the text area and click the font dropdown. Then, click “upload a font” which is located at the bottom of the font list. Then, click “upload a new font” from your brand kit page. Last, select the font to upload (the actual file and not the zipped folder).

After doing so, your newly-added font will be available from the font dropdown list!
Creating Thin Lines
As mentioned earlier, Canva makes design a breeze most of the time, but there are a few head-scratching items that just require a bit of experience.
The first time you might experience this is when you’re trying to create simple thin and thick lines in Canva.
To create a line of different weight or thickness, go to “Elements” and select the first line available. To make it thinner, resize the line to your desired weight (yes, the line is going to get very small; utilize zoom in and out to complete the step if needed). Then, you’ll want to extend the line longer so it meets your desired length.
Outlining Text
Maybe you noticed or maybe you didn’t, but now upon me mentioning it, are thinking, “oh yeah!” And that’s how to outline text in Canva. What was for quite a while a manual struggle to outline text in Canva, you can now do so with the click of a few buttons, but the option isn’t super obvious!
Going back to the above, you’re going to utilize “Effects” by selecting your text layer. Then, go to “Splice” and be sure to change the “Offset” to zero! Now you’ll have a perfect text outline in a matter of seconds.
Here is a video!
Music: https://www.bensound.com/
Combining Shapes for Custom Illustration
With Canva, the secret is obviously out, and for good reason. But one potential downside is that you might see the same elements and templates being used around your circles.
For me, I wanted to use Canva with KDP in order to publish a book with Amazon. The problem was, I needed to figure out how to illustrate the book despite not knowing how to draw, and, I didn’t want to use the same graphic elements that someone else could easily use for their own projects.
So, I began experimenting with combining shapes. Now, there isn’t much of a how-to here other than to open your imagination and try different things in order to gain practice and experience in this area.
For me, here is a sample of a few of the illustrations I was able to create, along with some examples with how I went about doing so.

Removing Backgrounds
One key piece of many design projects is being able to remove the background from a photo. It’s for that one reason I feel like the Canva Pro cost is worth it (and everything else on top of that makes access all the better).
Anyway, with Canva, you can remove the background from a photo image in a matter of seconds. You can also easily go back and touch up any areas that might have been missed, if any.
Sure, there are other tools that do the same, but the background remover being integrated within Canva and easily accessible and usable right from your project makes the process seamless.
Just select your photo and go to “Effects.” Then click “Background Remover.” You’ll see in a matter of seconds the background will disappear.
I’ve rarely encountered an issue, but if something from the photo was removed when it shouldn’t have been, or, if not all of the background was removed, you also have these options to erase or restore if needed.

Downloading with Transparent Background
Say “no” to downloading designs that have a white box or border around them! Meaning, if you spend the time to create a great logo or design, you want to be able to use that design on top of and within other pieces, which is where a transparent background comes in.
![]()
When going to “Download” select PNG and then check the box for “Transparent background.” Once done, the design you downloaded will turn out to be just the design, without a background at all.

Using Animation
There are a few ways to use animation with Canva, and this way is using the actual “Animate” option.
When you click it, you’ll see the following options:
- Block
- Breathe
- Fade
- Pan
- Rise
- Tumble
- Drift
- Stomp
- Tectonic
- Baseline
- Pop
- Neon
- Scrapbook
(Those in italics are only available via Canva Pro.)
By clicking each of these options, you’ll add a different animated element to your entire graphic. It’s probably best and easiest for you to play around with the different options, but here is an example of what you can accomplish.

Creating an Animated GIF
Now, you can create an animated GIF in Canva as shown with the above example. But, you can also do so without having to utilize “Animate.” And actually, the method above and what I’m about to go through now will result in much different outputs.
Think of this as a GIF that blinks or flashes, but really, by utilizing different pages within your design and downloading them all together as a GIF, you can create a fun animated feature.
Here is what I mean.

The way I accomplished this was simply creating a single design, and then clicking the “duplicate” button in order to create multiples of the same page.
I then made minor adjustments to each page so then when put together with each other, they provide a flash effect. Meaning, your GIF is going to cycle through as follows:
Page 1: Original design
Page 2: Original design but different color font
Page 3: Original design
Etc.
Using Frames
Thinking about how many times you have a great photo, but just wish it could take on a different shape than just your typical rectangle. That’s the beauty of frames! If you go to “Elements” and then “Frames” you’ll see the different available options.
With each of these, you simply add to your design, and then drag in a photo or video to fit them inside. You can also double-click the image once it’s inside the frame in order to move and shift it within the frame itself.
Music: https://www.bensound.com/
Resizing Designs
One thing you have to get used to with Canva is that you can’t traditionally rotate to landscape view as you would in something like Word. Instead, you’ll need to resize the entire design in order to achieve the orientation you’re striving for.
It might sound like a pain on the surface, but it’s easy, and beyond that, it’s easy to resize (and reuse) designs for social media, presentations, ads, and more.
You’ll need Canva Pro (try for 30 days) but when you have it, simply go to “Resize” in the main menu, and enter your desired dimensions, or, search for a template to transform to.
If you click “Resize” it will resize your current workspace, but if you click “Copy & resize” then it will preserve your original design while creating a copy of the new one at the new size.

Change the Background Color
If you have a photo and want to swap the background or change/add color, you first need to remove the background by selecting your photo, going to “Effects” and then “Background remover” (You’ll need Canva Pro for this step, which again, don’t fret because you can try free for 30 days.)
Once you’ve removed the background, you can go to “Backgrounds” and simply choose a new one. You can also go to “Photos” and choose a backdrop from there, and just move it to the back layer via “Position.”

Adding Gradient
Let’s say you have a photo that you want to blend into your design, or one you’d like to add text to without plastering over the main photo elements, but rather place “off to the side” in an elegant manner.
That’s where adding a gradient in Canva comes in.
There are a few different steps to this one, so in the interest of keeping this already-long post as short as possible while still being informative, here is the video that breaks down the process:
Music: https://www.bensound.com/
Using Canva Color Palette
If you’re new to Canva, you might have not discovered the Canva color picker, or as it’s officially called, the color palette generator.
It’s a tool for you to upload a photo that then spits out the main colors of tht photo! So, if you’re trying to match a design to a color in Canva, this is the way to go about it.

Creating Shadows & Silhouettes
One last useful tip is how to add a shadow to an image (or, alternatively, how to turn a photo into a silhouette).
In short, the process includes removing the background from your photo, and creating a copy of that now background-less photo. With your copy selected, you then go to “Effects” and then “Duotone.” Choose “Cherry” and then change the color of both “Highlights” and “Shadows” to black.
From there, you can move the copy behind the original for your shadow, or as your silhouette.
Again, a few steps, but here is a video to help you through it:
Music: https://www.bensound.com/
And with that, you should be well on your way to using Canva for at least a few projects! Be sure to check back as I’ll be adding to this post with new tips and info.


